| With Remote Desktop Connection, you can sit at a PC and connect to another PC in a different location (the remote PC). Remote desktop is a long-time Windows feature that lets you access a remote PC, over your home network or the Internet, and interact with it in a full-screen or windowed interface as if you were sitting in front of that PC. The only difference is speed and, sometimes, graphical fidelity. This guide below will walk you through the process of setting up your Windows 8 computer to handle incoming Remote Desktop Connections from authenticated users and how to connect to a remote computer. Windows 8 actually offers a new-style (formerly known as "Metro") app for remote desktop connections, too, and it works on Windows RT as well as Windows 8 and Windows 8 Pro. Remote desktop requires two pieces, one on the PC you wish to remotely access and one on the PC you are currently using. (It may also require a third piece which enables connectivity over the Internet; more on that in a bit.) The PC that you wish to access remotely needs something called Remote Desktop Host, which is not available in the base, or core, version of Windows 8. This feature requires Windows 8 Pro or Enterprise. (If you are trying to connect to the base version of Windows 8, you will need to upgrade electronically to Windows 8 Pro or seek out a third party remote access solution like VNC. I recommend Windows 8 Pro.) The PC that you are using to remotely access another PC needs the Remote Desktop Connection (RDC) software, which comes for free with every version of Windows (including all Windows 8 versions.) |
- Make sure both PCs are powered up and connected to the Internet. They can't be in Sleep or Hibernate state, either. To prepare the "host," or the machine that you'll be taking control of
- Enable Remote Assistance. Open the Control Panel, and type "Remote" in its search box. You could also right-click on Computer and choose Properties, and then choose Remote settings on the left panel. You'll open a Properties sheet with the top choice of "Allow Remote Assistance connections to this computer." Make sure this box is checked.
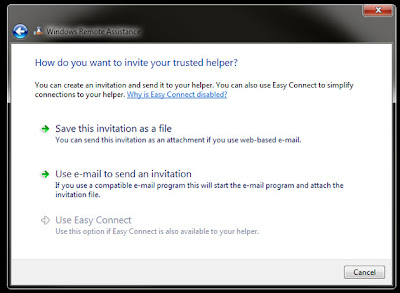
- Ask someone to connect. At the computer to be controlled, type "Remote Assistance" in the Start button's search box, and then click on Windows Remote Assistance. This opens the following dialog:Click "Invite someone you trust to help you."
- Send the Invitation. Next you'll see three options for sending the invitation:You'll notice that the last (and best) option, Use Easy Connect, is grayed out on my screenshot: This will be the case if both computers aren't using Windows 7 or 8, with some corporate networks, and if your router doesn't support Peer Name Resolution Protocol. When I connected to a public Wi-Fi network, the option became available. In any case, send the invitation to the user of the computer that's going to do the remote controlling. And Easy Connect lives up to its name: If it's available, that's the one you should use.
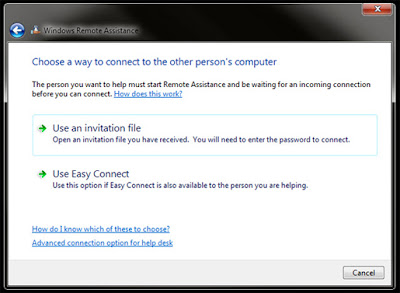
- Guest Connection. After the invitation to take control has been sent, the controller must start Remote Assistance just as in step 3, but choose "Help someone who has invited you." The first time you connect to a PC this way, you'll be asked to "Choose a way to connect to the other person's computer," with the choices being an invitation file and using Easy Connect. Choose the appropriate one:Note that after the first connection, the controller will see a different set of options: The login icons for computers he's already connected to and a blank one labeled "Help someone new." On a repeat connection using a contact's icon, the dialog will show a progress bar with the text " Searching for contact…"
- Accept Connection. After the controller/guest has sent the request to view the host PC, the latter gets another confirmation. The controller/guest can then see the host's screen in a large window. He can view the other PC's screen to fit or at full size. Note that color settings were dumbed down for this to work, so don't expect to proof those pro photos. On a not-so-great Internet connection, the redrawing of the screen can also be painfully slow. A big help once this connection is made is that there's a chat box for both users. The controlled PC also has Pause and Stop Sharing buttons. Settings let him choose or turn off bandwidth-conserving features like color depth and window background. A fancy desktop wallpaper can slow down screen redrawing, so consider the dumbing-down options.
- Request Control. The next step is to take control. The controller-guest has a big "Request control" button at top left. As with every step above, the user of the PC to be controlled has to confirm the request. One option here for the host/controlee's response, besides the simple yes and no, is the "allow user x to respond to user account controls." For detailed support, you'll probably want to check that box.And that's it. Remember, the next time you want to connect the same user, you'll have fewer steps, especially if the host/controlee PC checks the option to add Easy Connect requester to his contacts. But keep in mind that this method always requires a request to be viewed and controlled, so you won't be able to connect to an unattended PC. For that, you'll need to use one of the third-party options above or Windows' Remote Desktop Connection, involving a more business IT–level setup.
Source: http://www.pcmag.com/


0 comments:
Post a Comment