Monday, September 30, 2013

Improve Both Web Browsing Speed and Security with Alternative DNS

Did you know that a simple configuration change might be able to improve both your Internet browsing performance and security? It's free and takes only about a minute of your time!

We're talking about "change your DNS server". Here's a brief introduction to what DNS is, how it affects your connection speed, and how you can easily change your computer's settings to use the fastest DNS possible.

The Domain Name System (DNS) may easily roll off the tongue of your nearest network administrator guru, but the average user probably doesn't know or care what DNS is, or what it does for them. DNS is the glue that binds domain names and IP addresses together.

Every internet service provider usually has their own DNS server, but it's not always the fastest. ften, the fastest DNS server is the one that's physically closest to your location. If you switch to a faster one, that means it looks up those IP addresses and gets you where you want to go faster than before.

Users that are not known to the term DNS needs to understand that DNS servers are used to resolve the domain name to an IP address of the website requested. Whenever a website a requested through a browser, the request is sent to the DNS servers to translate the domain name to an IP address so that request can be sent to the IP address of the website servers. This is how DNS works and yes DNS does affect the browsing speed, because if your current DNS service takes hell lot of time to resolve the domain name and get the website server IP address then you will feel that your Broadband connection is working slow.

Best of all, many alternative DNS providers are free for the public to use. Third-party DNS servers can also have other perks, like content filtering. We've talked about alternate DNS servers before, like OpenDNS, Google Public DNS and Norton ConnectSafe, but if you want to find out which one's right for you, you can do so with a simple program.
The best way to switch DNS providers is at your router, this way you only have to change it in one place. Once you change it on your router, all the clients on your network (assuming that you are using DHCP to automatically assign IPs to client devices) should point to the new DNS servers automatically.

Check your router's help manual for details on how and where to change your DNS resolver server entries. Mine were automatically set by my cable company and I had to disable the automatic DHCP IP grab on the WAN connection page and set it to manual in order to be able to edit the DNS resolver IP addresses. There are usually two to three places to enter the DNS Server IP addresses.

Before you make any changes, you should check with your ISP and your router manufacturer for specific instructions for your situation. You should also write down current settings or screen capture the settings page before you make any changes, in case the change doesn't work.

How to Determine and Set Up the Fastest DNS Server for Your Connection

On Windows: You can change Windows' DNS settings deep in the Control Panel, but the free DNS Jumper makes it a lot easier:

  • Download DNS Jumper, and extract it to any location on your hard drive. It's a portable application, so there's no need to install it—just start it up.
  • If you know what DNS server you want to use, pick it from the drop-down menu or type it in the boxes at the bottom. If not, hit the "Fastest DNS" button on the left. It'll check a number of different servers to find out which one is the fastest for you.
  • When it's done, click the "Apply DNS Servers" button to use the fastest server.
On OS X: If you're on a Mac, you can change your DNS servers in your Network settings (see step 3 below). If you want to find the fastest DNS server, try a utility like Namebench. It isn't quite as fast as the Windows alternative, and you'll still have to apply your DNS settings manually, but it works:

  • Download Namebench and start it up. Again, you don't need to install, just double click on it to run it.
  • Make sure the top two checkboxes are checked, and choose your location from the "Your Location" dropdown menu. Then, hit the "Start" button to run the test. Mark down the result when it's done.
  • Head to System Preferences > Network. Select your network connection in the left sidebar (AirPort if you use Wi-Fi, Ethernet if you use Ethernet), and go to the DNS box on the right. Type in the the two IP addresses you want to use (the ones Namebench came up with), and then close System Preferences.
If you don't feel that one service is doing a good job with filtering, you can always try another provider to see if they are any better.

Free & Public DNS Servers list
---------

Thursday, September 26, 2013

Netgear Wireless Router AC 1750 Dual Band Gigabit (R6300-100PAS) Review

Make sure you get what you ordered..!

Make sure you get the R6300-100PAS, not just R6300, the main reason to buy it was to get one USB 3.0 port, which is available only in Netgear Wireless Router R6300 v2.

The NETGEAR R6300 v2 Smart WiFi Router with AC1750 dual band is the world's fastest WiFi router delivering AC1750 WiFi and Gigabit Ethernet speeds. This router offers ultimate performance in wireless coverage for large homes with 12 or more wireless devices. With the R6300 v2, get 3x faster access and more reliable streaming.

The Netgear R6300 v2 delivers the speed and reliability needed for applications such as smooth, lag-free multiple HD video streaming, multi-player gaming, ultra-fast speed and a secure and reliable connection to the Internet. The Netgear R6300v2 also includes NETGEAR genie® home network manager for easy installation and home network management.

Compatible with next-generation WiFi devices and backward compatible with 802.11 a/b/g/n devices, it enables HD streaming throughout your home. With up to 450+1300 Mbps† speed and simultaneous dual band WiFi technology, the Netgear R6300v2 avoids wireless interference, ensuring top WiFi speeds and reliable connections especially for dual band wireless devices like iPad and iPhone5.

In addition, Beamforming+ technology boosts speed, reliability and range of WiFi connections. The dual-core 800 MHz processor delivers high-performance connectivity, while the USB 3.0 port provides up to 10x faster USB hard drive access.

---------

Tuesday, September 24, 2013

How To Setup A Remote Desktop Connection in Windows 8

With Remote Desktop Connection, you can sit at a PC and connect to another PC in a different location (the remote PC).

Remote desktop is a long-time Windows feature that lets you access a remote PC, over your home network or the Internet, and interact with it in a full-screen or windowed interface as if you were sitting in front of that PC. The only difference is speed and, sometimes, graphical fidelity.

This guide below will walk you through the process of setting up your Windows 8 computer to handle incoming Remote Desktop Connections from authenticated users and how to connect to a remote computer.

Windows 8 actually offers a new-style (formerly known as "Metro") app for remote desktop connections, too, and it works on Windows RT as well as Windows 8 and Windows 8 Pro.

Remote desktop requires two pieces, one on the PC you wish to remotely access and one on the PC you are currently using. (It may also require a third piece which enables connectivity over the Internet; more on that in a bit.)

The PC that you wish to access remotely needs something called Remote Desktop Host, which is not available in the base, or core, version of Windows 8. This feature requires Windows 8 Pro or Enterprise. (If you are trying to connect to the base version of Windows 8, you will need to upgrade electronically to Windows 8 Pro or seek out a third party remote access solution like VNC. I recommend Windows 8 Pro.)

The PC that you are using to remotely access another PC needs the Remote Desktop Connection (RDC) software, which comes for free with every version of Windows (including all Windows 8 versions.)
  1. Make sure both PCs are powered up and connected to the Internet. They can't be in Sleep or Hibernate state, either. To prepare the "host," or the machine that you'll be taking control of
  2. Enable Remote Assistance. Open the Control Panel, and type "Remote" in its search box. You could also right-click on Computer and choose Properties, and then choose Remote settings on the left panel. You'll open a Properties sheet with the top choice of "Allow Remote Assistance connections to this computer." Make sure this box is checked.
    Enable Remote Assistance
  3. Ask someone to connect. At the computer to be controlled, type "Remote Assistance" in the Start button's search box, and then click on Windows Remote Assistance. This opens the following dialog:
    Remote Assistance
    Click "Invite someone you trust to help you."
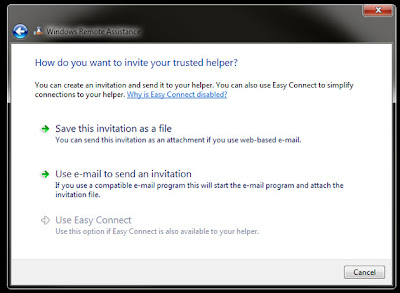
  4. Send the Invitation. Next you'll see three options for sending the invitation:
    Send the Invitation
    You'll notice that the last (and best) option, Use Easy Connect, is grayed out on my screenshot: This will be the case if both computers aren't using Windows 7 or 8, with some corporate networks, and if your router doesn't support Peer Name Resolution Protocol. When I connected to a public Wi-Fi network, the option became available. In any case, send the invitation to the user of the computer that's going to do the remote controlling. And Easy Connect lives up to its name: If it's available, that's the one you should use.
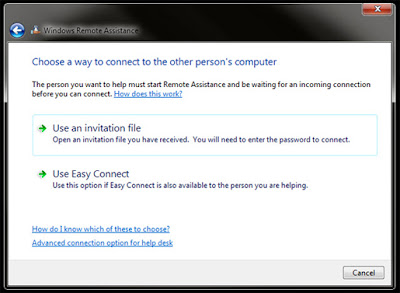
  5. Guest Connection. After the invitation to take control has been sent, the controller must start Remote Assistance just as in step 3, but choose "Help someone who has invited you." The first time you connect to a PC this way, you'll be asked to "Choose a way to connect to the other person's computer," with the choices being an invitation file and using Easy Connect. Choose the appropriate one:
    Help someone who has invited you

    Note that after the first connection, the controller will see a different set of options: The login icons for computers he's already connected to and a blank one labeled "Help someone new." On a repeat connection using a contact's icon, the dialog will show a progress bar with the text " Searching for contact…"
  6. Accept Connection. After the controller/guest has sent the request to view the host PC, the latter gets another confirmation. The controller/guest can then see the host's screen in a large window. He can view the other PC's screen to fit or at full size. Note that color settings were dumbed down for this to work, so don't expect to proof those pro photos. On a not-so-great Internet connection, the redrawing of the screen can also be painfully slow. A big help once this connection is made is that there's a chat box for both users. The controlled PC also has Pause and Stop Sharing buttons. Settings let him choose or turn off bandwidth-conserving features like color depth and window background. A fancy desktop wallpaper can slow down screen redrawing, so consider the dumbing-down options.
  7. Request Control. The next step is to take control. The controller-guest has a big "Request control" button at top left. As with every step above, the user of the PC to be controlled has to confirm the request. One option here for the host/controlee's response, besides the simple yes and no, is the "allow user x to respond to user account controls." For detailed support, you'll probably want to check that box.
    And that's it. Remember, the next time you want to connect the same user, you'll have fewer steps, especially if the host/controlee PC checks the option to add Easy Connect requester to his contacts. But keep in mind that this method always requires a request to be viewed and controlled, so you won't be able to connect to an unattended PC. For that, you'll need to use one of the third-party options above or Windows' Remote Desktop Connection, involving a more business IT–level setup.
Source: http://www.pcmag.com/

Post Popular

Powered by Blogger.