Showing posts with label Wi-Fi Home Networks. Show all posts

Tuesday, September 24, 2013

How To Setup A Remote Desktop Connection in Windows 8

With Remote Desktop Connection, you can sit at a PC and connect to another PC in a different location (the remote PC).

Remote desktop is a long-time Windows feature that lets you access a remote PC, over your home network or the Internet, and interact with it in a full-screen or windowed interface as if you were sitting in front of that PC. The only difference is speed and, sometimes, graphical fidelity.

This guide below will walk you through the process of setting up your Windows 8 computer to handle incoming Remote Desktop Connections from authenticated users and how to connect to a remote computer.

Windows 8 actually offers a new-style (formerly known as "Metro") app for remote desktop connections, too, and it works on Windows RT as well as Windows 8 and Windows 8 Pro.

Remote desktop requires two pieces, one on the PC you wish to remotely access and one on the PC you are currently using. (It may also require a third piece which enables connectivity over the Internet; more on that in a bit.)

The PC that you wish to access remotely needs something called Remote Desktop Host, which is not available in the base, or core, version of Windows 8. This feature requires Windows 8 Pro or Enterprise. (If you are trying to connect to the base version of Windows 8, you will need to upgrade electronically to Windows 8 Pro or seek out a third party remote access solution like VNC. I recommend Windows 8 Pro.)

The PC that you are using to remotely access another PC needs the Remote Desktop Connection (RDC) software, which comes for free with every version of Windows (including all Windows 8 versions.)
  1. Make sure both PCs are powered up and connected to the Internet. They can't be in Sleep or Hibernate state, either. To prepare the "host," or the machine that you'll be taking control of
  2. Enable Remote Assistance. Open the Control Panel, and type "Remote" in its search box. You could also right-click on Computer and choose Properties, and then choose Remote settings on the left panel. You'll open a Properties sheet with the top choice of "Allow Remote Assistance connections to this computer." Make sure this box is checked.
    Enable Remote Assistance
  3. Ask someone to connect. At the computer to be controlled, type "Remote Assistance" in the Start button's search box, and then click on Windows Remote Assistance. This opens the following dialog:
    Remote Assistance
    Click "Invite someone you trust to help you."
  4. Send the Invitation. Next you'll see three options for sending the invitation:
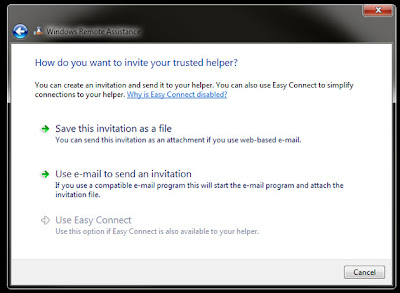
    Send the Invitation
    You'll notice that the last (and best) option, Use Easy Connect, is grayed out on my screenshot: This will be the case if both computers aren't using Windows 7 or 8, with some corporate networks, and if your router doesn't support Peer Name Resolution Protocol. When I connected to a public Wi-Fi network, the option became available. In any case, send the invitation to the user of the computer that's going to do the remote controlling. And Easy Connect lives up to its name: If it's available, that's the one you should use.
  5. Guest Connection. After the invitation to take control has been sent, the controller must start Remote Assistance just as in step 3, but choose "Help someone who has invited you." The first time you connect to a PC this way, you'll be asked to "Choose a way to connect to the other person's computer," with the choices being an invitation file and using Easy Connect. Choose the appropriate one:
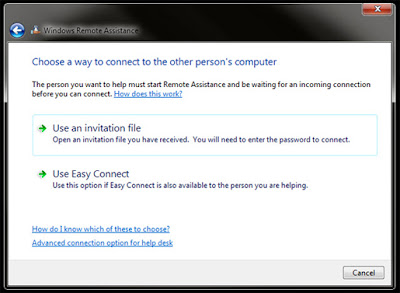
    Help someone who has invited you

    Note that after the first connection, the controller will see a different set of options: The login icons for computers he's already connected to and a blank one labeled "Help someone new." On a repeat connection using a contact's icon, the dialog will show a progress bar with the text " Searching for contact…"
  6. Accept Connection. After the controller/guest has sent the request to view the host PC, the latter gets another confirmation. The controller/guest can then see the host's screen in a large window. He can view the other PC's screen to fit or at full size. Note that color settings were dumbed down for this to work, so don't expect to proof those pro photos. On a not-so-great Internet connection, the redrawing of the screen can also be painfully slow. A big help once this connection is made is that there's a chat box for both users. The controlled PC also has Pause and Stop Sharing buttons. Settings let him choose or turn off bandwidth-conserving features like color depth and window background. A fancy desktop wallpaper can slow down screen redrawing, so consider the dumbing-down options.
  7. Request Control. The next step is to take control. The controller-guest has a big "Request control" button at top left. As with every step above, the user of the PC to be controlled has to confirm the request. One option here for the host/controlee's response, besides the simple yes and no, is the "allow user x to respond to user account controls." For detailed support, you'll probably want to check that box.
    And that's it. Remember, the next time you want to connect the same user, you'll have fewer steps, especially if the host/controlee PC checks the option to add Easy Connect requester to his contacts. But keep in mind that this method always requires a request to be viewed and controlled, so you won't be able to connect to an unattended PC. For that, you'll need to use one of the third-party options above or Windows' Remote Desktop Connection, involving a more business IT–level setup.
Source: http://www.pcmag.com/

Friday, July 12, 2013

Boost Your Wireless Signal

In the modern home, we often have multiple Wi-Fi devices, such as laptops & tablets. Your home wi-fi network can be fickle, with connectivity coming and going without restraint. If you're having problems with your wireless network, here's a few tips to help you improve the signal.

The main keys to improving your wireless network’s signal are positioning your router properly — taking obstructions into account — and reducing interference from other wireless networks and household appliances.
Switch channels

Wi-Fi routers operate on specific channels. You can change the channel of your router by going into its interface. All routers have different ways to access the interface, so check with your manufacturer. A good, free tool Tools such as inSSIDer or Wifi Stumbler will show you how many routers are broadcasting in your area and the channel they use. Please note these are third party applications which we do not offer support for.

Update router firmware

Perhaps the easiest way to improve your router's performance is by ensuring that its firmware and driver are up to date. Check often for firmware updates for your router.

Update adapter firmware

Just like routers, network adapters on PCs and laptops also are subject to firmware updates. Remember, good wireless range and performance is dictated not just by the router but by the network adapter on clients

Move your router

Choose a central location to help the wireless signal reach all areas of your property (or the areas where you are mostly likely to want to connect from). Ideally, position your router high up in the room, perhaps on top of a book shelf, with no immediate obstacles around it. Don't be tempted to hide it away in a cabinet - it needs to be out in the open and free from obstructions like walls and furniture.

You can purchase custom length Ethernet Cat 5 cable from Amazon or any place that services computers (although if you do that, this is technically no longer a free options) if you need more flexibility in centrally positioning the router.

-->
Set up a second router as an access point or repeater

You can set up just about any router as a wireless access point. To do so, you need to connect the second router's LAN port to the primary router's LAN port. On the second router, you will want to give it the same addressing information as the primary router. For example, if you primary router's IP address is 192.168.2.1 and its netmask is 255.255.255.0; then you could make the second router's IP 192.168.2.2 and use the same netmask. It's also important that you assign the same SSID and security on the second router and turn DHCP off on the second one as well.

Upgrade the antenna
Consider a hi-gain antenna, which you can position so that the Wi-Fi signal goes in the direction you want.

Use Repeaters/Extenders

A wireless repeaters/extender can extend the range of your Wi-Fi signal by 'bouncing' it over a greater distance.

Get new Router/Adapters

The fastest current 802.11n Wi-Fi connections max out at around 150Mbps with one antenna, 300Mbps with two and 450Mbps with three antennas. 802.11ac connections will be roughly three times faster - so that's 450Mbps, 900Mbps and 1.3Gbps respectively.

Secure your connection

If you don't have a Wi-Fi password then anyone within range of your router could be 'stealing' your broadband. Not only will this slow you down, but could also land you in trouble with the law if the freeloader is up to no good online - their connection would be traced to your property.
---------

Wednesday, July 3, 2013

Simple Tips to Build a Wireless Network Without a Router

Build a Wireless Network Without a Router can save money, but isn't always as reliable as a standard wireless router.

A lot of people don’t know that if you run Windows 7, Windows Vista or even Windows XP, it is possible to build your own wireless network at home or office without using a wireless router or a wireless access point.

Most new desktops and laptop computers are already equipped with internal network adapters so you are ready to go without a router. If your computer doesn’t have built-in wireless capabilities, you can either buy a USB network adapter that plugs into the USB port of your desktop or go for a wireless adapter that directly plugs into your notebook’s PC Card slot. Desktop users can also opt for an internal wireless PCI card but you’ll have to open the computer case in order to install this network adapter.

In order to build your own wireless network you will need the following:

  • A broadband Internet connection;
  • A wireless network card installed on each computer that you want to connect to your wireless network;
In this tutorial we will show you step-by-step how to build this kind of wireless network, also known as ad-hoc.

Using the Microsoft Windows operating system, go to "Start -- Connect to -- Show All Connections." Right-click on the wireless connection, and choose "Properties." If you don't see an option for "Show All Connections", go to "Start - Control Panel - Network Connections."


-->
Click the "Wireless Networks" tab. Choose "Add" to create a network. Type a name for the network in the "Network Name (SSID)" box. Choose whether to use a wireless network key or not. Use "Open" for "Network Authentication." Choose either "WEP" or "Disabled" from the "Data Encryption" drop down. Choosing "WEP" will allow you to create a network key that will be required to connect to the network. This method is more secure. Enter a 5- to 13-character network key in the "Network Key" and "Confirm Network Key" boxes. You alternately can check the "The Key is Provided for Me Automatically" check box if you want Windows to create and use a key for you automatically.

Check the "This is a computer to computer (ad-hoc) network" check box to create the ad hoc network. Click "OK" when finished. If the box is grayed out, press "Advanced" in the "Wireless Networks" tab and choose "Computer to computer (ad hoc) network."

Enable ICS on the router computer, which will allow you to share your Internet connection.
Right click your Internet connection while still in the "Network Connections" screen. Choose "Advanced." Check the "Allow other network users to connect through this computer's Internet connection" check box. Choose "Wireless Network Connection" and press "OK."

Select the shared network from other computers to connect. Right click the wireless networks icon in the notification tray. Press "View Available Networks." Select the appropriate network name and press "Connect."

Note:
Ad-Hoc wireless networking is available on Windows XP, Vista and Windows 7 while Virtual WiFi, which is much easier to setup, is available on Windows 7 or Windows Server 2008.

To set up Ad Hoc networking, your main computer needs to have an Ethernet based Internet connection as well as a Wireless (WLAN) network adapter. In the case of Virtual Wi-Fi, the Ethernet card is optional so you can turn a laptop into a hotspot even if your laptop itself is connected to a Wireless network and not to an Ethernet cable.
---------

Tuesday, July 2, 2013

Best Practices to Secure Your Wireless (Wi-Fi) Home Network

Wi-Fi home networks with Web access are particularly vulnerable to viruses and hackers. Securing a wireless network is very important because if you don't, your neighbors can not only borrow your Internet connection, but also access your files and check up on what you're doing.

Wireless Networking has made it so easy for you to use the computer, portable media player, mobile phones, video game consoles, and other wireless devices anywhere in the house without the clutter of cables.

Here a few simple things that you should to secure your wireless network:
Open your router settings page
You need to know how to access your wireless router’s settings and then enter the correct user name and password for the router. This is different for each router, so first check your router’s user manual.
To find your Gateway IP Address and connect to it in Windows:
  • Click Start > Run > type 'cmd' > Click 'Enter'
  • Once the Command Prompt window opens, type 'ipconfig /all' and hit 'Enter'
  • Locate the line labeled 'Gateway' and make note of the number that follows. It will look similar to '192.168.1.1'
  • Open Internet Explorer (or your favorite browser)
  • Enter the Gateway IP Address into the address bar and click 'Enter'
To find your Gateway IP Address and connect to it on a Mac
  • Open your Finder and run 'Terminal' inside of Applications > Utilities
  • Once the terminal window opens, type 'ipconfig -a' and hit 'Enter'
  • Locate the line labeled 'Gateway' and make note of the number that follows. It will look similar to '192.168.1.1'
  • Open Safari (or your favorite browser)
  • Enter the Gateway IP Address into the address bar and click 'Enter'
-->
Create a unique password on your router
The first thing you should do to secure your network is to change the default password of the router to something more secure. Don't use easily guessed passwords for your WPA2 or router access passwords. The best way to generate a secure key is to use an offline random number generator or write the entire alphabet in uppercase and lowercase and numbers 0-9 on separate pieces of paper, mix the paper up and randomly pick up pieces and return them, mixing them up again each time; each character you pull out becomes a character in your key.

Change the Service Set Identifier (SSID) from the default to something unique
This setting is usually under the basic wireless settings in your router's settings page. The SSID (or Wireless Network Name) of your Wireless Router is usually pre-defined as "default" or is set as the brand name of the router. The default SSID for ease of configuration is a simple name, which the hackers can easily determine.

Enable Network Encryption on your access point
To enable encryption on your Wireless network, open the wireless security settings on your router’s configuration page. This will usually let you select which security method you wish to choose; if you have older devices, choose WEP, otherwise go with WPA2. Enter a passphrase to access the network; make sure to set this to something that would be difficult for others to guess, and consider using a combination of letters, numbers, and special characters in the passphrase.

Filter MAC addresses on your Access Point or router
MAC Address filtering will register the hardware MAC Address of your networked devices, and only allow devices with known MAC Addresses to connect to your network.

To enable MAC address filtering, first make a list of all your hardware devices that you want to connect to your wireless network. Find their MAC addresses, and then add them to the MAC address filtering in your router’s administrative settings. You can find the MAC address for your computers by opening Command Prompt and typing in “ipconfig /all”, which will show your MAC address beside the name "Physical Address". You can find the MAC addresses of Wireless mobile phones and other portable devices under their network settings, though this will vary for each device.

Disable wireless administrating
Change the setting that allows administrating the router through a wireless connection to 'off' (meaning that you need to connect with a LAN cable for administration).

Reduce the Range of the Wireless Signal
Minimize leakage of wireless signal by placing router and access points in the center of your home. Setting up these devices in a balcony or near a window/door sends the signal outside, where it can be easily used by other appropriately configured devices.

Upgrade your Router’s firmware
You may need to upgrade the Firmware of your Access Point or Router to make sure that your router is running the latest firmware.
---------

Post Popular

Powered by Blogger.